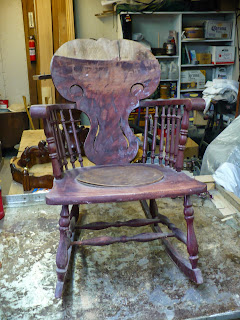
This old (approximately turn of the century) rocking chair came in recently. As you can see it had been neglected for many years.
Amazingly the structure of the chair was in good shape and sound. With the obvious exception of the multi-ply backboard. It appeared to have sat where a drip fell on the back and destroyed the ply's. And don't forget the ubiquitous plywood seat!
The chair came apart with little problem as the joints were very dry. The back was screwed onto the frame of the chair back and the seat so removal was no problem at all. Bungees helped in re-gluing.
Stripping was another matter altogether! Here is a shot of the beginning of the process. Stripper, denatured alcohol, spirits, lacquer thinner, even lye would not touch it. Eventually I used bleach on a recommendation, and it worked! I believe the original color was some type of a dye, possibly applied hot. Trust me it was hard to remove. In fact I never got all of the color out. I also found out the chair was built out of oak, maple and possibly fir.
I had to design and construct a jig in order to shape the new back. I used 3/4" oak face plywood and pine.
Sheeting was 1/4" cabinet grade plywood, the same as I used for the new back.
In order to achieve the correct radius, I used 1/4" mahogany face cabinet grade plywood to make the new back. Three layers gave me the correct thickness.
The shots show the new back being formed in the jig. I soaked and pre-formed the sheets and allowed to dry. I then glued the plywood sheets together with hot hide glue and allowed to dry for 36 hours.
A jungle of clamps!
Here is the formed and still rectangular piece fresh from the jig.
The original back was used to make a paper template for transfer to the newly formed back blank.
I taped the areas where the decorations were cut (by coping saw) to minimize tear out.
Above show the new back being fitted to the chair. You can also see how much color remained after three full days of stripping. Above right shows the new opaque stain being applied. It was slightly darker than the customer originally wanted but they were very understanding with the problems I faced and agreed the darker color was best in hiding the original reddish color.
Above shows the final stages of the staining. Before the lacquer finish coats were applied, I rubbed through the stain in select spots on the back, arms, front of the rockers, etc. to mimic original wear.
The customer believed the chair seat was originally caned. The absence of any holes or channel combined with numerous tack holes convinced me it had a leather or embroidery seat. Above shows the new webbing installed.
Over the webbing I placed a 1" piece of medium density foam to close the gap between the web and the new seat cover.
The customer balked at the cost of new seat leather, so I substituted a new embossed fiber cover instead. These are very durable and inexpensive and they look great! Fiber seat cover was attached with antiqued nail-heads.
At last, a job well done. In nearly twenty years of repair and restoration work this was the first time I had made a replacement back of this type. The learning curve was huge, the knowledge gained was tremendous. Most of all the customer was very happy as this was a piece he had all but given up on seeing restored.


No comments:
Post a Comment